Deploy Vue CLI Project to Github Pages

Note: This is for Vue CLI 3

Setup vue.config.js

Manually create a vue.config.js under root folder

module.exports = {
  publicPath: process.env.NODE_ENV === 'production'
    ? '/REPO-NAME/'
    : '/'
}

Deploy to gh-pages Branch

Create a deploy.sh file

#!/usr/bin/env sh

# abort on errors
set -e

# build
npm run build

# navigate into the build output directory
cd dist

# if you are deploying to a custom domain
# echo 'www.example.com' > CNAME

git init
git add -A
git commit -m 'deploy'

# if you are deploying to https://<USERNAME>.github.io
# git push -f git@github.com:<USERNAME>/<USERNAME>.github.io.git main

# if you are deploying to https://<USERNAME>.github.io/<REPO>
# git push -f git@github.com:<USERNAME>/<REPO>.git main:gh-pages

cd -

I actually pull this off from Vue CLI, but it doesn’t work for me.

<https://i.imgur.com/5lbdlob.png>

This was cause by my gh-pages brach name. Uncomment line 23

# git push -f git@github.com:<USERNAME>/<REPO-NAME>.git main:gh-pages

and change main to master will fix the problem.

git push -f git@github.com:<USERNAME>/<REPO-NAME>.git master:gh-pages
Devise Confirmable with SendGrid

After setting up Devise gem, add default_url_option to development.rb.

config/environments/development.rb

config.action_mailer.default_url_options = { host: 'localhost', port: 3000 }

Generate a User model

$ rails generate devise User

Uncomment confirmable fields in newly created migration file
db/migrate/2020xxxxxxx_devise_create_users.rb

## Confirmable
t.string   :confirmation_token
t.datetime :confirmed_at
t.datetime :confirmation_sent_at
t.string   :unconfirmed_emailreconfirmable

Add :confirmable to User.rb

app/models/user.rb

   devise :database_authenticatable, :registerable,
          :recoverable, :rememberable, :validatable,
          :confirmable

In deveise.rb, configurate sender’s email and reconfirmable state.

  # this email have to be the same as SendGrid Sender Identity
  config.mailer_sender = "example@gmail.com"

config/environments/development.rb

  # SendGrid
ActionMailer::Base.smtp_settings = {
  :user_name => Rails.application.credentials.dig(:sendgrid, :username),
  :password => Rails.application.credentials.dig(:sendgrid, :password),
  :domain => 'your domain',
  :address => 'smtp.sendgrid.net',
  :port => 587,
  :authentication => :plain,
  :enable_starttls_auto => true
}

Rails.application.credentials.sendgrid(:username) does not work here!

Store you credentials in master.key

$ EDITOR='code --wait' rails credentials:edit
 sendgrid:
   username: "apikey" # leave it as is
   password: "Your API key"

Errors I ran into:

log/production.log

I, [2021-06-28T02:29:03.586863 #1835748]  INFO -- : [46c46c7d-2f67-4def-9e9f-7a64dd5d5493] Completed 500 Internal Server Error in 305ms (ActiveRecord: 2.0ms | Allocations: 1831)
F, [2021-06-28T02:29:03.589058 #1835748] FATAL -- : [46c46c7d-2f67-4def-9e9f-7a64dd5d5493]
[46c46c7d-2f67-4def-9e9f-7a64dd5d5493] ActionView::Template::Error (Missing host to link to! Please provide the :host parameter, set default_url_options[:host], or set :only_path to true):
[46c46c7d-2f67-4def-9e9f-7a64dd5d5493]     2:
[46c46c7d-2f67-4def-9e9f-7a64dd5d5493]     3: <p>You can confirm your account email through the link below:</p>
[46c46c7d-2f67-4def-9e9f-7a64dd5d5493]     4:
[46c46c7d-2f67-4def-9e9f-7a64dd5d5493]     5: <p><%= link_to 'Confirm my account', confirmation_url(@resource, confirmation_token: @token) %></p>
[46c46c7d-2f67-4def-9e9f-7a64dd5d5493]

Forgot to configure default_url_options in environments/production.rb

Net::OpenTimeout (execution expired)

log/production.log

I, [2021-06-28T03:09:52.753696 #1845775]  INFO -- : [d23e7eed-eb39-4a53-a330-90bc7719cad6] Delivered mail 60d8cce2b74c7_1c2a0f53fc980c@localhost.mail (30003.8ms)
I, [2021-06-28T03:09:52.754019 #1845775]  INFO -- : [d23e7eed-eb39-4a53-a330-90bc7719cad6] Completed 500 Internal Server Error in 30014ms (ActiveRecord: 4.1ms | Allocations: 2705)
F, [2021-06-28T03:09:52.755417 #1845775] FATAL -- : [d23e7eed-eb39-4a53-a330-90bc7719cad6]
[d23e7eed-eb39-4a53-a330-90bc7719cad6] Net::OpenTimeout (execution expired):
[d23e7eed-eb39-4a53-a330-90bc7719cad6]

Need to contact VPS support

Note:

  • Configure SendGrid using SMTP relay.
  • SendGrid Sender Identity must be setup in order for this to work
  • Must use the verified email (as Sender Identity) on the config.mailer_sender in devise.rb
  • Linode have SMTP port restrictions in place on all Linodes by default, need to open up a support ticket to unblock the port

References:
Module: Devise::Models::Confirmable — Documentation for heartcombo/devise (master)
ActionMailer - E-mail 發送 - Rails 實戰聖經
卡卡米的記憶體: Ruby - 使用 Devise confirmable

Unable to send mail from my rails web application | Linode Questions
Devise and SendGrid integration into rails 6 - DEV Community

Rails 重新部署後 Active Storage 的圖片 404 Not Found

情況:

把 rails 專案部署到 production 後,原有在 production 的圖片會消失。Rails 專案本身有使用 Active Storage,但沒有儲存第三方,所以 develop 跟 production 都使用 :local。

storage.yml

local:
  service: Disk
  root: <%= Rails.root.join("storage") %>

production.rb

# Store uploaded files on the local file system (see config/storage.yml for options).
config.active_storage.service = :local

原因:

只有 storage 目錄下的東西被加進 gitignore, storage 本身並沒有被 ignore,所以每次 push 上去會推一個空的 storage 資料夾,而 production 的資料夾就會被蓋掉。

.gitignore

# Ignore uploaded files in development.
/storage/*

解法:

在 deploy.rb 下加入 “storage” 至 append :linked_dirs 。只要把 storage 指定為共享目錄,這樣子就不會被覆蓋了。

append :linked_dirs, "log", "sorage", "tmp/pids", "tmp/cache", "tmp/sockets", "public/system"

Reference: Rails 6 Active Storage Attachment 404 not found

Resources

ICON COLLECTIONS

https://icones.netlify.app/

蒐藏蠻多種類的 icon 的,每種都可以下載或直接複製為 JSX、Vue Component、React Component、URL 等等…

https://heroicons.com/

@steveschoger 製作的一個 icon collection 網站,目前擁有 230 icons。主要可以複製 svg code & JSX code,對 react user 比較有好一點。

WEB SITE COLLECTIONS

https://mediaqueri.es/
蒐藏很多 RWD 網站。我在學習製作 responsive web 時經常參考這網站。

CSS 小技巧:把最後一行的 items 往左推

在做 flex box 排序時經常會遇到最後一行的 item 無法填滿空間而跑道中間。

https://codepen.io/william_k/pen/xxOagBG

在 .container 裡面,items 後方加入

<i aria-hidden="true"></i>
.container i {
  width: 300px; //需要把每個 item 的寬設定一樣
  margin: 10px;
}

這樣子可以自動把元素往左推。

https://codepen.io/william_k/pen/oNLPZNY

Reference:

https://dev.to/stel/a-little-trick-to-left-align-items-in-last-row-with-flexbox-230l

自適應圖片&背景

圖片

<main class="container landing-banner">
    <img src="img/slide.jpg" alt="title page image" />
</main>
.landing-banner {
  width: 100%;

  img {
    width: 100%;
    max-height: 496px; // 設定圖片最大高度,將多餘部分讓 object-fit 材切掉
    object-fit: cover; // 填滿並維持原比例,多餘的材掉
  }
}

範例

Reference:

MDN: object-fit

背景

<main class="container landingbanner"></main>
.landingbanner {
  width: 100%;
  height: 496px;

  background-image: url("../img/slide.jpg");
  background-repeat: no-repeat;
  background-size: cover;
  background-position: center;
  background-color: pink;
}

範例

Holy Grail Layout Using Flexbox

以聖杯版型為例子學習 Flex Box

Holy Grail (聖杯版型) - desktop first

https://drive.google.com/uc?export=view&id=1j9FsG97iolTTdOdqy5Oa2Yev7E8R38oH

HTML Structure

<div class="holy_grail">
  <header>
    <h3>Header</h3>
    <p>desktop first</p>
  </header>

  <div class="container">
    <main>
      <h3>Main</h3>
    </main>
    <aside>
      <h3>Aside</h3>
    </aside>
    <article>
      <h3>Article</h3>
    </article>
  </div>

  <footer>
    <h3>Footer</h3>
  </footer>
</div>
@import "reset.css";

body {
  padding: 0;
  margin: 0;
}

.holy_grail {
  display: flex;
  flex-direction: column;
  height: 100vh;
  background-color: rgb(206, 240, 178);
}

header {
  background-color: rgb(187, 187, 187);
  display: flex;
  justify-content: center;
  flex-direction: column;
  align-items: center;

  h3 {
    margin: 0;
  }

  p {
    margin: 0;
  }
}

.container {
  display: flex;
  justify-content: center;
  flex-direction: row;
  height: 100%;
  main {
    background-color: rgb(255, 215, 215);
    // flex-basis: 700px; // 軸長
    flex-grow: 4;
  }

  aside {
    flex-grow: 1;
    order: -1;
    background-color: rgb(165, 241, 203);
  }

  article {
    flex-grow: 1;
    background-color: rgb(173, 226, 240);
  }
}

footer {
  background-color: rgb(250, 233, 178);
}

加入 media query

https://drive.google.com/uc?export=view&id=1VMDfBZFC5iuFuZ_2gF0PlFb7TNWYImuW

// mobile breakpoint
@media (max-width: 600px) {
  .container {
    flex-direction: column;
  }
}

https://codepen.io/william_k/pen/rNLxLGo

Holy Grail (聖杯版型) - mobile first

flex 屬性

flex: 0 1 auto;

flex: 默認值包含 flex-grow, flex-shrink, flex-basis

flex-grow: 放大比例,default 為 0 (在剩餘空間不放大)

flex-shrink: 縮小比例,default 為 1 (空間不足會適當縮小)

flex-basis: 控制元素的主軸的長度 (width)

flex: none; // flex : 0,0,auto;

flex: auto; // flex:1,1,auto;

flex: 1; // flex:1,1,0%;

html 沿用上方的 code

<div class="holy_grail">
  <header>
    <h3>Header</h3>
    <p>mobile first</p>
  </header>

  <div class="container">
    <main>
      <h3>Main</h3>
    </main>
    <aside>
      <h3>Aside</h3>
    </aside>
    <article>
      <h3>Article</h3>
    </article>
  </div>

  <footer>
    <h3>Footer</h3>
  </footer>
</div>
@import "reset.css";

body {
  padding: 0;
  margin: 0;
}

.holy_grail {
  background-color: rgb(206, 240, 178);
  height: 100vh;
  display: flex;
  flex-direction: column;
  // flex: auto; flex: 1 1 auto;
}

header {
  background-color: rgb(187, 187, 187);
  display: flex;
  align-items: center;
  flex-direction: column;

  h3 {
    margin: 0;
  }

  p {
    margin: 0;
  }
}

.container {
  display: flex;
  flex-direction: column;
  flex: 1 1 auto; // 在 .container & main 上需要把高度撐開

  main {
    background-color: rgb(255, 215, 215);
    flex: 1 1 auto;
  }

  aside {
    background-color: rgb(165, 241, 203);
    order: -1; // order first
  }

  article {
    background-color: rgb(173, 226, 240);
  }
}

footer {
  background-color: rgb(250, 233, 178);
}

/* Extra small devices (phones, 600px and down) */
@media only screen and (max-width: 600px) {
}

/* Small devices (portrait tablets and large phones, 600px and up) */
@media only screen and (min-width: 600px) {
}

/* Medium devices (landscape tablets, 768px and up) */
@media only screen and (min-width: 768px) {
  .container {
    display: flex;
    flex-direction: row;
    main {
      flex-grow: 4;
    }
    aside {
      flex-grow: 1;
    }
    article {
      flex-grow: 1;
    }
  }
}

/* Large devices (laptops/desktops, 992px and up) */
@media only screen and (min-width: 992px) {
}

/* Extra large devices (large laptops and desktops, 1200px and up) */
@media only screen and (min-width: 1200px) {
}

https://codepen.io/william_k/pen/bGeEeaY

Reference:
MDN: Flexbox

MDN: flex 屬性

flex:1 和 flex:auto 区别

Iterm2 + zsh + oh-my-zsh

趁著重新安裝系統,筆記如何安裝及美化 Iterm。(macOS Catalina 的 terminal 已經內建 zsh,省了一個步驟。)

安裝 Homebrew

從安裝 Homebrew 開始,之後會透過 Homebrew 來安裝&管理套件。只要從 Homebrew 官網 https://brew.sh/index_zh-tw 就會提示如何安裝。

在 Terminal 貼上即可安裝

/bin/bash -c "$(curl -fsSL https://raw.githubusercontent.com/Homebrew/install/master/install.sh)"

安裝 Homebrew Cask

# 第一次使用 homebrew cask
$ brew tap caskroom/cask -> $ $ brew tap homebrew/cask
$ brew install brew-cask
# 錯誤 Error: caskroom/cask was moved. Tap homebrew/cask instead.
# 現在似乎不用安裝 cask,直接 brew cask install 要安裝的軟體名稱

Reference: https://stackoverflow.com/questions/58335410/error-caskroom-cask-was-moved-tap-homebrew-cask-cask-instead

安裝 Iterm2

使用 brew cask 來安裝 Iterm2。

$ brew cask install iterm2

brew 和 brew cask 有何不同?
brew 通常主要安裝 command line tools,brew cask 延伸了 brew 的方式,並可以安裝圖形介面軟體。

安裝字型

https://github.com/ryanoasis/nerd-fonts#option-4-homebrew-fonts

$ brew tap homebrew/cask-fonts
$ brew cask install font-hack-nerd-font

安裝 oh-my-zsh

https://ohmyz.sh/#install

$ sh -c "$(curl -fsSL https://raw.github.com/ohmyzsh/ohmyzsh/master/tools/install.sh)"

安裝 Powerlevel9k 在 oh-my-zsh 下

https://github.com/Powerlevel9k/powerlevel9k/wiki/Install-Instructions#option-2-install-for-oh-my-zsh

$ git clone https://github.com/bhilburn/powerlevel9k.git ~/.oh-my-zsh/custom/themes/powerlevel9k

更改了 .zshrc 檔案後記得要 $ exec $SHELL 才會重新讀取更新後的設定。

9K 還沒開始使用就發現有 10K 了 XD

https://github.com/romkatv/powerlevel10k

安裝 Powerlevel10K

git clone --depth=1 https://github.com/romkatv/powerlevel10k.git ${ZSH_CUSTOM:-$HOME/.oh-my-zsh/custom}/themes/powerlevel10k

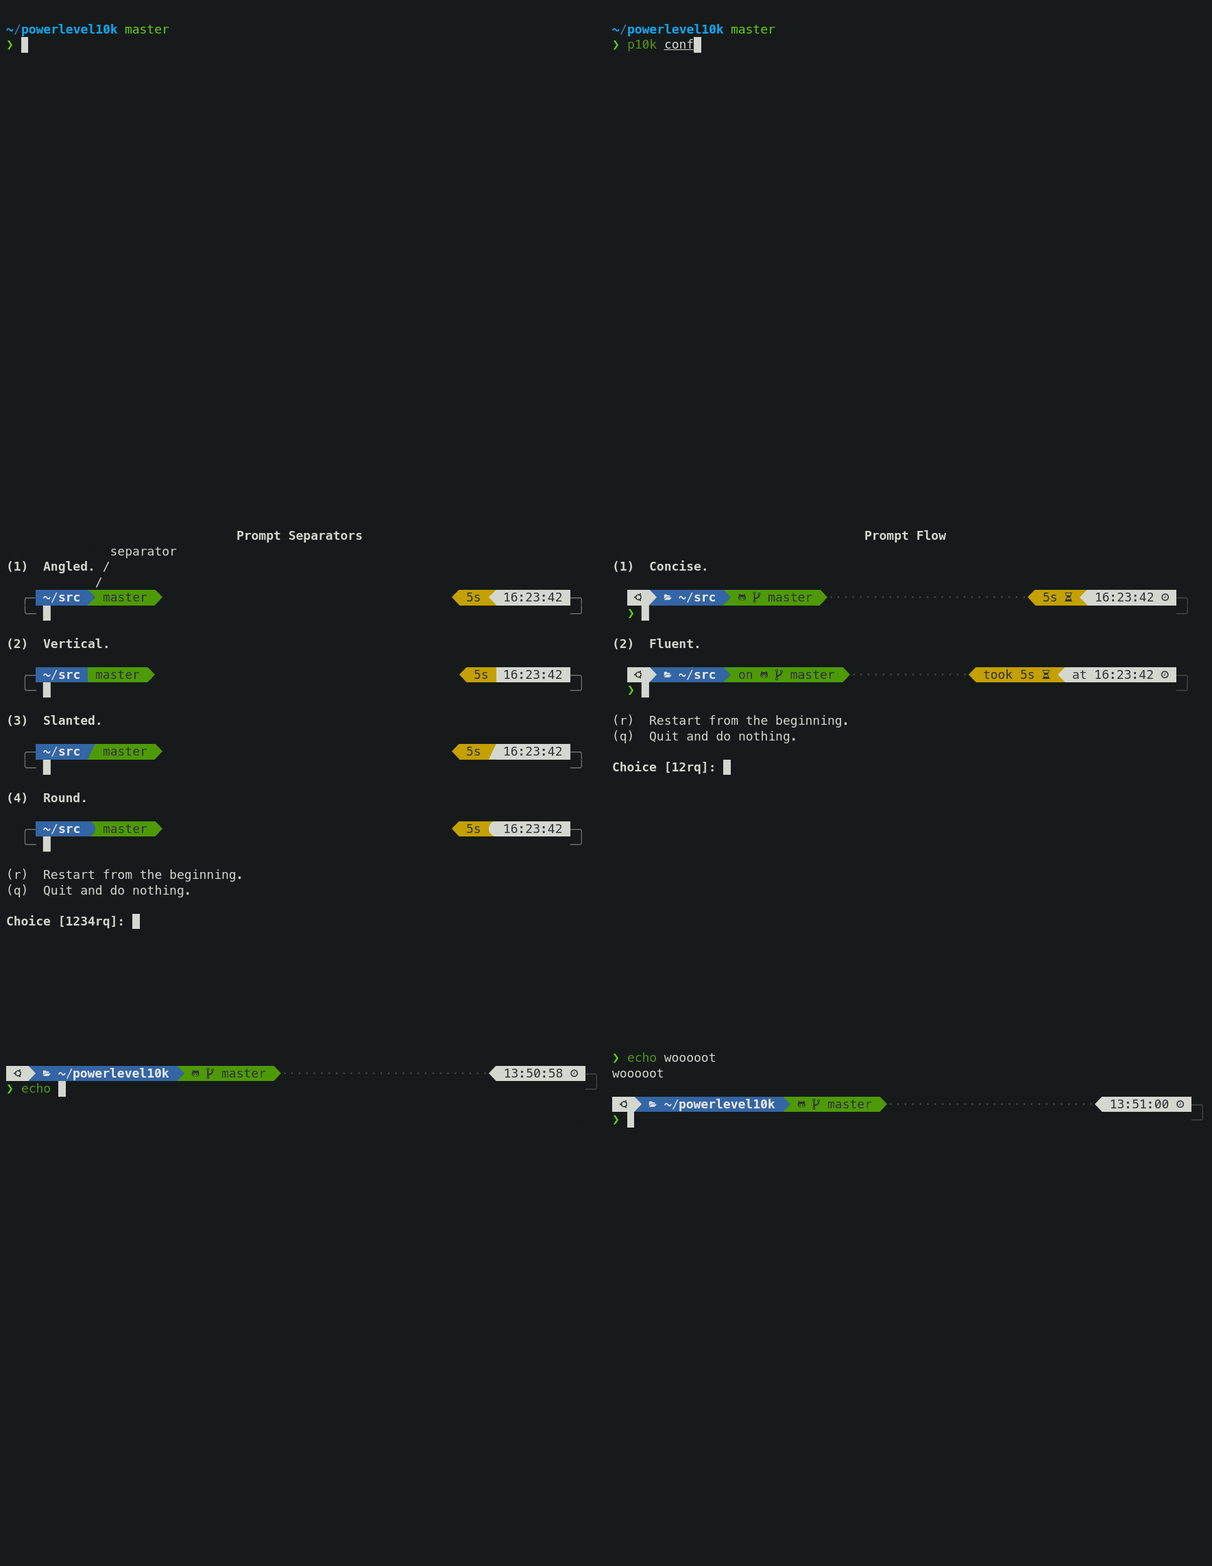
Powerlevel10K 有內建模板製作精靈,很適合懶人我

$ p10k configure

官方示意圖:
https://raw.githubusercontent.com/romkatv/powerlevel10k-media/master/configuration-wizard.gif

Resources:

Homebrew

超簡單!十分鐘打造漂亮又好用的 zsh command line 環境 - Gary Chu (Dec 29, 2017)

[心得] iTerm2 + zsh,打造更好的工作環境 - Huli (Jan 3rd, 2016)

Vue CLI - 環境變數&模式

今天用 Vue CLI 建置了一個 project,發現放置環境變數的 config 目錄不見了,也找不到 .env 之類的檔案。參考了官方文件,順便做一下筆記。

Modes and Environment Variables
https://cli.vuejs.org/guide/mode-and-env.html

Mode 模式

Vue CLI 有三種模式:development, test, production

舊版 package.json

# 這是之前舊版 Vue CLI 產生的 package.json
"scripts": {
  "dev": "webpack-dev-server --inline --progress --config build/webpack.dev.conf.js",
  "start": "npm run dev",
  "build": "node build/build.js"
},

舊版環境文件

# dev.env.js

'use strict'
const merge = require('webpack-merge')
const prodEnv = require('./prod.env')

module.exports = merge(prodEnv, {
  NODE_ENV: '"development"',
  APIPATH: '"https://vue-course-api.hexschool.io"',
  CUSTOMPATH: '"ur_will_kome"'
  // NODE_ENV: '"development"',
  // API_PATH: '"https://vue-course-api.hexschool.io"',
  // CUSTOM_PATH: '"ur_will_kome"'
})

現行版本的 package.json

"scripts": {
  "serve": "vue-cli-service serve", # 預設使用 development
  "build": "vue-cli-service build", # 在 build 時會使用 production 環境文件 (.env, .env.production, .env.production.local 等)
},

Vue CLI 有三種模式:development, test, production,不同模式下會使用不同的環境文件。

# Modes

development is used by vue-cli-service serve
test is used by vue-cli-service test:unit
production is used by vue-cli-service build and vue-cli-service test:e2e

環境變數

# Environment Variables

只要在根目錄下加入環境文件即可。命名方式如下:

# 環境文件
.env.env            # loaded in all cases
.env.local          # loaded in all cases, ignored by git
.env.[mode]         # only loaded in specified mode
.env.[mode].local   # only loaded in specified mode, ignored by git

如果後方有加上 .local 則不會上傳到 git,在 local 端的環境文件都會被忽略。

## .gitignore

# local env files
.env.local
.env.*.local
NODE_ENV: '"development"',
API_PATH: '"https://www.example.com/api/"'

之前的寫法跟現在不太一樣。
目前環境文件使用 key=value 組成,斷行不需要用, 也不用 quotation (用單引號跟雙引號去包起來)

NODE_ENV=development
VUE_APP_TITLE=我是環境文件
VUE_API_PATH=https://www.abcdefg.com/api/

** 如果要在程式裡使用到環境變數,變數命名需要以 VUE_APP 開頭

使用環境變數

console.log(process.env.VUE_APP_TITLE) // => 我是環境文件
Firebase Actions

Connect to database

const database = firebase.database();

Bind Data

get data and push them to messages array

database.ref('messages').on('child_added', snapshot => {
  this.messages.push(snapshot.val())
})

// Include ID
// value = snapshot.val() | key = snapshot.key
database.ref('messages').on('child_added', snapshot => {
  this.messages.push({...snapshot.val(), id: snapshot.key})
  console.log(this.messages)
})

Firebase Actions

write data into database

database.ref('messages').push({text: this.messageText, nickname: this.nickname})

// data gets created if the path is not existed
// '/' 代表一個節點
database.ref('nodeOne/nodeTwo/nodeThree').set('third')
database.ref('nodeOne').child('nodeTwo').child('nodethree').set('3rd')

// ps: case sensitive
messages
|--    -L8HkVXx_jUWUXDIVDlR
    |--    nickname: Will
    |-- text: HelloWorld

nodeOne
|--    nodeTwo
    |--    nodeThree: third
    |-- nodethree: 3rd

delete data

database.ref('messages').child('ID').remove()

// delete message and re-render the DOM
database.ref('messages').on('child_removed', snapshot => {
  const indexOfDeletedMsg = this.messages.findIndex( message => message.id === snapshot.key)
  this.messages.splice(indexOfDeletedMsg, 1)
})

remove from DOM will cause other online users not seeing messages been removed, only if they refresh the page

update

// set text value
// database.ref('messages').child('ID').child('text').set('updated value')

database.ref('messages').child('-MHP86XkIhmaSzN9Fodt').update({text: 'updated message'})

// fetch data form the updated ms
database.ref('messages').on('child_changed', snapshot => {
  const updateMessage = this.messages.find(message => message.id === snapshot.key)
  updateMessage.text = snapshot.val().text
})

update multiple records

messages['-Fei3Eee7a/name'] = 'Will'
messages['-L8kSxxE/name'] = 'Will'
messages['-L8kSxxE/text'] = 'new message'

database.ref().update(messages)